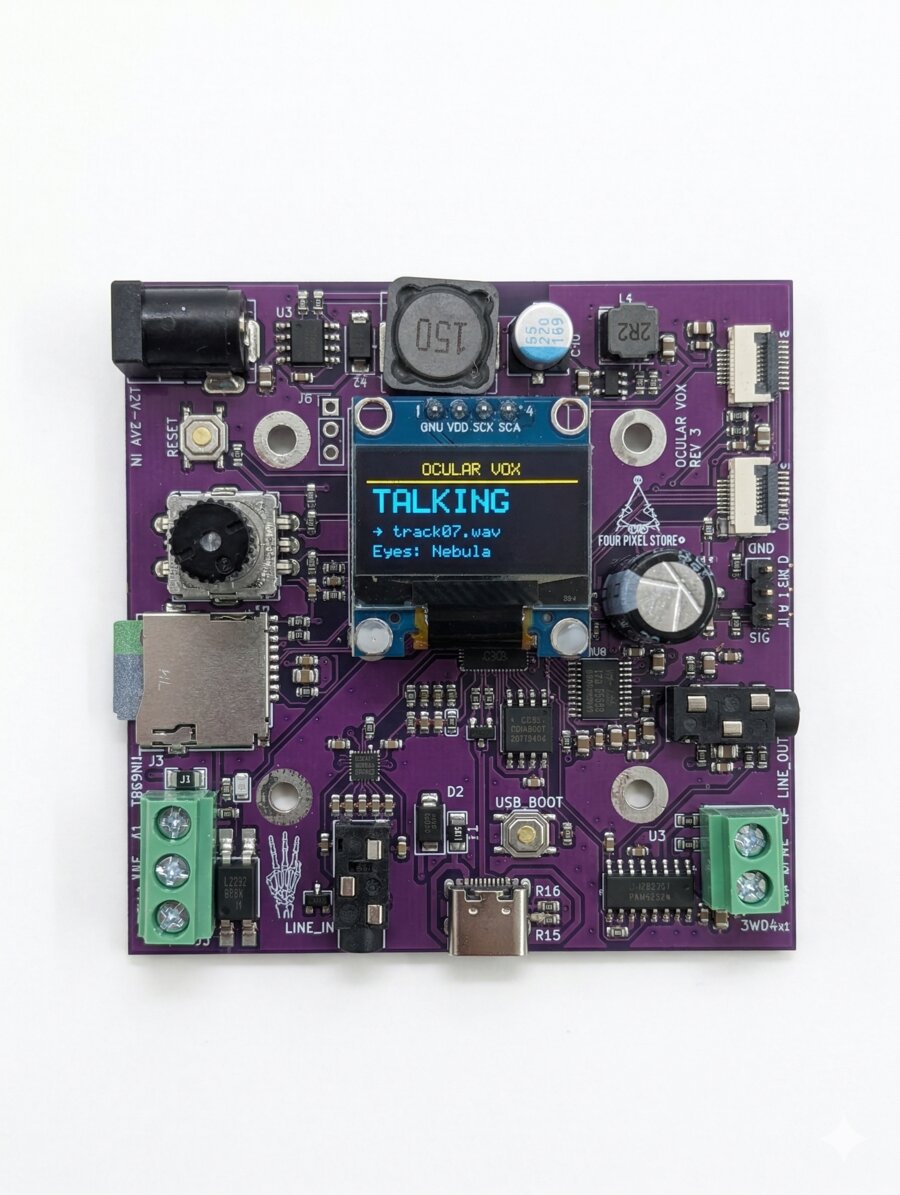
Contents
1. Hardware Setup
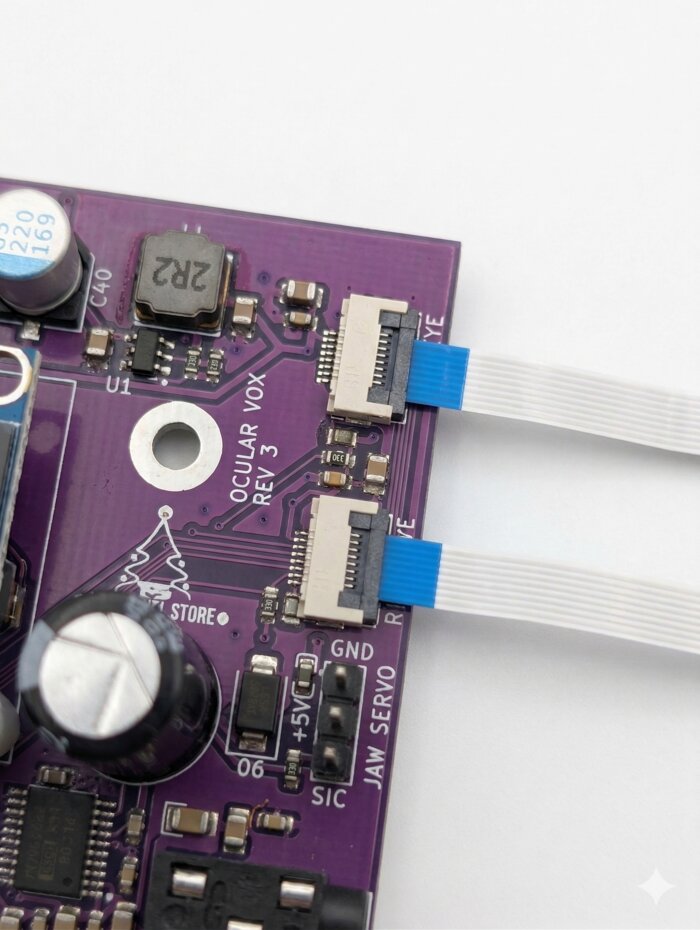
LCD Eye Displays
Connect the two round LCD displays using the FPC ribbon cables. The connectors are on the top edge of the board, labeled LEFT EYE and RIGHT EYE.
• Board side (LEFT EYE / RIGHT EYE): flip-type latch. Lift the latch up, slide the cable in, press the latch back down to lock.
• LCD side: slide-type latch. Pull the latch straight back (toward the cable), insert the cable, then push the latch forward to lock.
In both cases: pins face down, blue reinforcement tab faces up. If it's fighting you, flip the cable around — it goes in one way only.
Speaker (Optional)
Connect a 4Ω 3W speaker to the screw terminals labeled SPKR. Polarity matters — + and − are labeled on the terminal. You can also use the line-level audio output to feed powered speakers or an external amp.
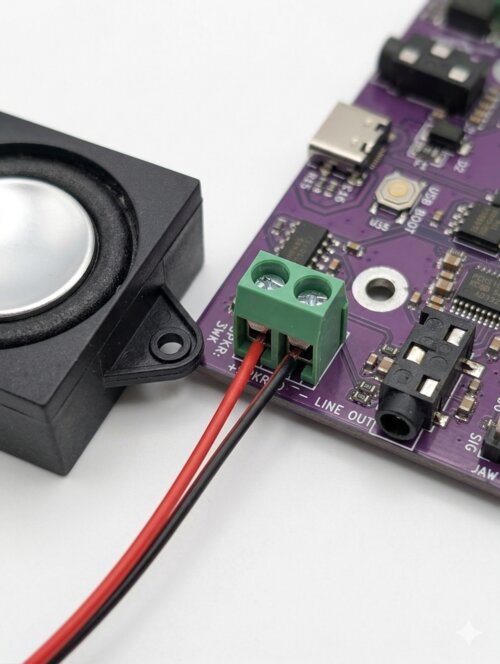
The onboard DAC is surprisingly good. You'll hear it.
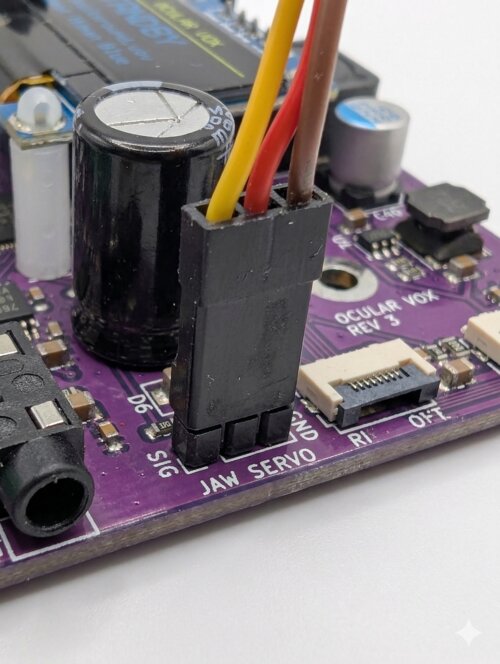
Jaw Servo
Standard 50Hz hobby servo. Plug into the 3-pin vertical SERVO header. The connector is oriented with GND on top, +5V in the middle, and SIG on the bottom. Black or brown wire goes on the top pin (GND).
Mounting
The board has a 40mm × 40mm mounting hole pattern using M3 screws. This is a standard spacing compatible with common prop mounting brackets and 3D-printable mounts available at ocularvox.com/resources.
Connector Reference
| Connector | Description |
|---|---|
| LEFT EYE / RIGHT EYE | FPC connectors for LCD eye displays (flip-type latch) |
| SPKR | Screw terminals for 4Ω speaker (+ and − labeled) |
| SERVO | 3-pin jaw servo header (top=GND, mid=5V, bot=SIG) |
| MicroSD | MicroSD card slot (FAT32, up to 32GB) |
| TRIG | 3-pin trigger input (pin1=GND, pin2=+5V, pin3=IN) |
| LINE IN | 3.5mm audio input jack (line level) |
| LINE OUT | 3.5mm audio output jack (line level); disables speaker when connected |
| USB-C | 5V power input + firmware updates |
| DC JACK | 12–24V barrel jack power input |
2. MicroSD Card & Audio Files
Card Requirements
- Format: FAT32 (exFAT and NTFS are not supported)
- Size: Up to 32GB. Cards over 32GB may need manual FAT32 formatting.
- Speed: Class 10 or better recommended
Audio Format
All audio files must be 16-bit PCM WAV format. We recommend 44.1kHz, Stereo for best results. Other formats (MP3, 24-bit, compressed) are not supported.
If your tracks don't play, the answer is almost always "it's not 16-bit PCM WAV." Every time.
Folder Structure
├─ /audio/ — Triggered voice tracks (up to 32)
│ ├─ 01_welcome.wav
│ ├─ 02_spooky_greeting.wav
│ └─ 03_go_away.wav
├─ /ambient/ — Background loops (optional)
│ └─ creepy_ambience.wav
└─ /eyes/ — Custom eye files (optional)
└─ demon_fire.eye
/audio/ play alphabetically. Prefix with numbers (01_, 02_, 03_) to control the playback order. Or enable Shuffle mode for random picks.
3. Power
The Ocular Vox has two power inputs:
| Input | Voltage | Best For |
|---|---|---|
| USB-C | 5V | Bench testing, firmware updates |
| DC Barrel Jack | 12–24V | Permanent installations, cleanest audio |
4. Menu System
Controls
| Action | What It Does |
|---|---|
| Rotate | Navigate menu items / adjust values |
| Press | Select item / enter edit mode / confirm |
| Long-press | Save all settings and exit menu instantly |
| Rotate (idle screen) | Adjust volume — Voice Vol during playback, BG Vol otherwise |
Full Menu Reference
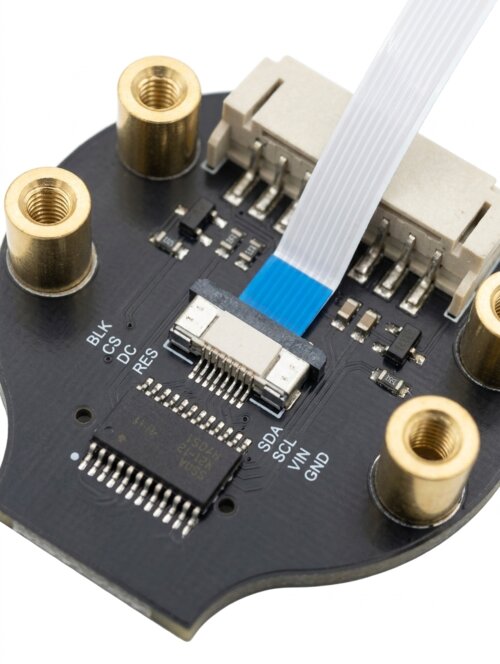
5. Eyes
The Ocular Vox drives two round 240×240 GC9A01 LCD displays. Depending on the model, the displays may include precision-cut glass lenses optically fused for a seamless finish, or standard bare LCDs.
Built-In Eye Styles
The firmware includes 9 built-in eye styles stored in flash memory. They load instantly and are always available, no MicroSD needed. These include human, demon, reptile, alien, and more.
Flip & Swap
Depending on how the LCDs are physically mounted in your skull, the eyes might appear upside down or swapped left/right. Instead of rewiring:
- Flip L / Flip R — rotates individual displays 180°
- Swap Eyes — swaps which display gets the left vs. right eye image
Changes preview live as you toggle them. No need to save and restart.
6. Audio & Jaw Servo
Triggered Playback
WAV files in the /audio/ folder are your triggered voice tracks. When the skull is triggered (by the trigger input, AutoPlay, or Browse Audio), it plays the next track in sequence (or a random one if Shuffle is on).
Background Audio
Enable BG Audio in the Audio menu to play ambient loops from the /ambient/ folder. If you have multiple files in the folder, they play sequentially and loop back to the first when they reach the end. The jaw does not sync to ambient audio — it's background atmosphere, not speech.
Volume Controls
There are two independent volume controls:
- Voice Vol — controls triggered WAV track volume
- BG Vol — controls ambient audio + line-in passthrough volume
The encoder knob adjusts volume from the idle screen. During triggered playback it adjusts Voice Vol. At all other times it adjusts BG Vol. A popup shows which one you're changing.
They don't cross. Voice Vol won't turn down your ambient, and BG Vol won't touch your triggers. We thought about it for like five whole minutes.
Jaw Servo Setup
On first boot, the jaw servo is disabled. This is intentional — nobody wants a servo flailing around before limits are set.
- Go to Menu › Jaw
- Set Jaw Open to the position where the jaw is fully open (live preview — the servo moves as you adjust)
- Set Jaw Close to the resting closed position
- Optionally adjust Exaggeration
- Save & Exit
How Jaw Sync Works
The Ocular Vox performs real-time FFT analysis on the audio output, measuring energy in the vocal frequency range. This energy level drives the servo position between your open and close limits. The result is realistic lip-sync with zero programming — as long as you feed it clean vocal tracks.
Exaggeration
The Exaggeration setting (100–200%) scales the vocal energy before mapping it to servo position. At 100%, the jaw moves proportionally to the audio. Crank it up toward 200% for more dramatic movement, especially useful for quieter tracks where the jaw might otherwise barely move.
200% exaggeration on a whispery ghost track is chef’s kiss.
7. Trigger Input
Wiring
The trigger terminal has three pins:
| Pin | Label | Function |
|---|---|---|
| 1 | GND | Ground — connect one side of your button/sensor here |
| 2 | +5V | +5V convenience output for powered sensors (PIR, etc.) |
| 3 | IN | Trigger input — connect the other side of your button/sensor here |
Basic Wiring (buttons & simple sensors)
Wire your button or contact closure between pin 1 (GND) and pin 3 (IN). When the circuit closes, the IN pin is pulled to ground and the skull triggers. That's it — two wires.
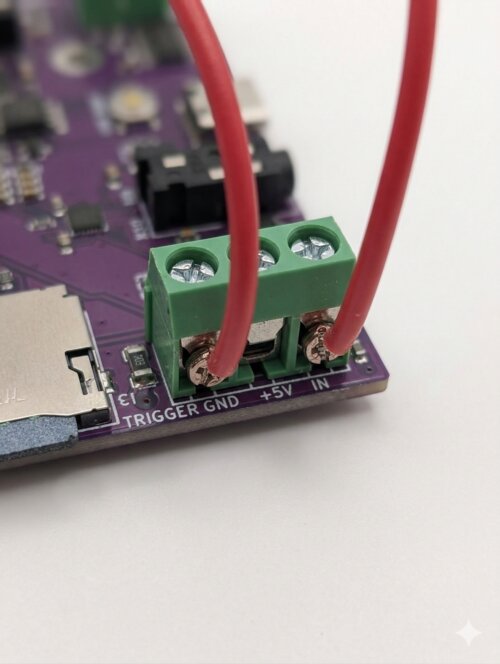
Powered Sensors (PIR, etc.)
Pin 2 provides +5V as a convenience output for sensors that need power, like PIR motion detectors. Connect the sensor's power to pin 2, ground to pin 1, and signal output to pin 3.
Compatible Sensors
- PIR motion sensors
- Push buttons / momentary switches
- Relay contacts
- Prop controllers (PicoBoo, etc.)
Cooldown
After a triggered track finishes playing, a cooldown timer prevents re-triggering. The default is 30 seconds. Adjust in the menu from 5 to 120 seconds. The cooldown starts when the audio finishes, not when the trigger fires.
8. Line-In Audio
The 3.5mm audio input accepts line-level audio from external sources. This audio is passed through to the speaker and also drives the jaw servo — perfect for live puppeteering.
Compatible Sources
- Phone or tablet (headphone jack or USB-C adapter)
- MP3 player or other audio device
- Raspberry Pi or computer audio output
- Microphone with inline preamp (for live puppeteering)
Microphone Note
The input is line-level only. Passive electret microphones (most cheap 3.5mm mics) will produce no sound — the board doesn't provide bias voltage. Use a self-powered microphone, a dynamic microphone, or add an inline battery-powered preamp.
How It Works
- Line-in passthrough is active when BG Audio is OFF. When BG Audio is ON, the board plays WAV files from
/ambient/instead. - Line-in volume is controlled by BG Vol.
- The jaw servo syncs to line-in audio just like triggered tracks — real-time FFT lip sync.
- During triggered WAV playback, line-in is temporarily muted. It resumes automatically when the track ends.
9. Custom Eyes
Eye Creator Tool
Design your own eye textures using our free online tool at ocularvox.com/eyes. No account required, no software to install. Everything runs in your browser.
You can:
- Generate sclera (whites) with customizable veins, colors, and bruising
- Generate iris textures with different patterns, colors, and limbal rings
- Upload your own images (photos, AI-generated art, etc.)
- Choose pupil shape (round, vertical slit, horizontal slit)
- Download the finished eye as a
.eyefile
Installing Custom Eyes
- Download the
.eyefile from the Eye Creator - Copy it to the
/eyes/folder on your MicroSD card - Insert the card and power on (or reset the board)
- Go to Menu › Eyes › Eye Style and scroll to your custom eye
- Save & Exit
Custom eyes are scanned at boot and appear in the eye selection menu alongside the built-in styles.
.eye files, you'll need to reset or power-cycle the board for the changes to appear.
10. Firmware Updates
- Download the latest
.uf2firmware file from ocularvox.com/resources - While the board is powered off, hold down the USB_BOOT button on the RP2040
- While holding USB_BOOT, connect USB-C to your computer
- A drive called RPI-RP2 will appear on your computer
- Drag and drop the
.uf2file onto that drive - The board will reboot automatically with the new firmware
11. Troubleshooting
| Problem | Solution |
|---|---|
| No sound | Check speaker wiring and polarity. Verify WAV files are 16-bit PCM. Make sure volume isn't at 0. If a cable is in the line-out jack, the speaker is disabled. |
| Buzzing / noise in audio | Use a quality power supply. Computer USB ports and cheap hubs inject noise. The 12V barrel jack gives the cleanest audio. |
| Jaw doesn't move | Jaw is disabled until you set limits. Go to Jaw menu, set Open and Close positions, save. |
| Jaw doesn't move with ambient audio | By design. The jaw only syncs to triggered voice tracks and line-in audio, not ambient background loops. |
| Trigger doesn't fire | Make sure you've exited the menu. Trigger is ignored while the menu is open. Also check the cooldown timer. |
| Trigger fires on menu exit | This was fixed in firmware v1.2. Update your firmware. |
| No line-in sound | Turn BG Audio OFF. Line-in only works when ambient audio is disabled. Also verify your source is line-level (not a passive mic). |
| Eyes upside down / swapped | Menu › Eyes › Flip L / Flip R / Swap. No rewiring needed. |
| MicroSD card not detected | Must be FAT32. Cards over 32GB are usually formatted exFAT by default — reformat as FAT32. |
| Mic doesn't work | The input is line-level only. Passive mics need a preamp. See Section 8. |
| Settings not saving | Long-press the encoder or select [Save & Exit]. Power cycling without saving discards changes. |
| Custom eyes not showing up | MicroSD is scanned at boot. Reset or power-cycle the board after adding .eye files. |
If all else fails, try turning it off and on again. It’s a cliché for a reason.
12. Specifications
| Feature | Details |
|---|---|
| Processor | RP2040 dual-core ARM Cortex-M0+ @ 125 MHz |
| Eye Displays | 2× GC9A01 round LCD, 240×240 pixels, SPI |
| Eye Styles | 9 built-in + unlimited custom via MicroSD |
| Audio DAC | PCM5102A I2S, 16-bit stereo |
| Audio ADC | ES7243E I2S, for line-in passthrough |
| Amplifier | PAM8406 stereo, 4Ω 3W per channel |
| Menu Display | SSD1306 OLED, 128×64, I2C |
| User Input | EC11 rotary encoder with push button |
| Jaw Servo | Standard 50Hz hobby servo output, 5V |
| Trigger | Opto-isolated, active-low, GND-to-IN |
| Storage | MicroSD, FAT32, up to 32GB |
| Audio Format | 16-bit PCM WAV, 44.1kHz recommended |
| Mounting | 40mm × 40mm, M3 screws |
| Power Input | USB-C (5V) or barrel jack (12–24V DC) |
| Firmware | v1.2.0 (April 2026) |